


Controllers and digital mixers get all the attention, but most DJ rigs still move their audio down an old-fashioned path: a microphone cable from the mixer’s master output to the front-of-house system, another pair to the booth monitors, and a spare XLR waiting in the bag for the inevitable last-minute microphone. When those runs are planned well, nobody notices them. When they are not, the gig sounds like it — hum, hiss, intermittent crackle, or a lead that comes up short exactly when you need one more metre.
This guide walks through the three decisions that shape an XLR run in a DJ context: how long the run actually needs to be, how the cable’s construction keeps noise out of a signal that often travels past lighting rigs and power strips, and how the cables are coiled, transported and inspected between gigs. The examples draw on the cable range we manufacture at LESOUND, including the MC033 professional microphone cable and the XR series XLR panel sockets that many mobile DJs build into their DJ tables.
Where XLR Fits in a Modern DJ Signal Chain
Even in a laptop-and-controller era, the XLR connector is the backbone of the professional signal chain. A typical mobile setup uses XLR in four places:
- Master output to the PA. Balanced XLR leads from the mixer to powered speakers or an amplifier rack, often the longest run of the night.
- Booth and monitor feeds. Shorter runs to the DJ’s own monitors, usually routed under or around the DJ booth.
- Microphone inputs. For announcements, MC work and ceremonial moments, plus wireless receiver outputs.
- Interconnections between processors. Crossovers, system controllers and wall panels in fixed installations.
All of these share one property that makes XLR the sensible choice: the connection is balanced. The two conductors carry the same audio signal in opposite polarity, and the receiving stage amplifies only the difference between them. Noise that couples into both conductors equally — the usual behaviour of mains hum and radio-frequency interference — cancels at the receiving end. The shield around the pair drains that interference away before it even gets that far. This is why a balanced XLR line tolerates a much longer run than an unbalanced connection of the same era, and why most venues hand you XLR for the run to the PA rather than anything else.
What Is Inside the Cable Matters More Than the Length
Two XLR leads of the same length can behave very differently on stage, and the difference lives in the construction. A professional microphone cable is a deliberately layered assembly:
- Conductors. Oxygen-free copper carries the signal with low resistance and consistent performance over long runs. In our recording-series cable, for example, each conductor is a 39-strand 0.10 mm OFC build (0.31 mm², 22 AWG) — many fine strands rather than one stiff core, which is what keeps the cable flexible after a season of coiling.
- Insulation. PE insulation on each conductor keeps capacitance stable and predictable, which matters for high-frequency detail and for phantom power behaviour on microphone runs.
- Filler. A cotton filler keeps the twisted pair centred and prevents the jacket from collapsing during bending. It sounds minor; it is one of the reasons some cables survive years of gigging and others go intermittent.
- Shield. Braided OFC, spiral-wrapped OFC, or aluminium foil with a drain wire — each is a different trade-off between coverage, flexibility and handling.
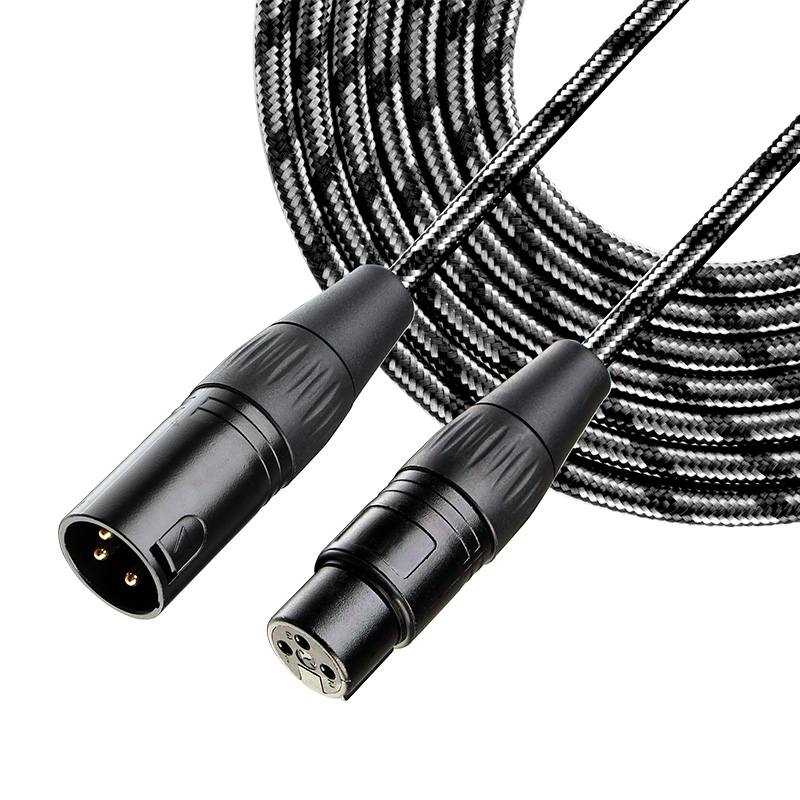
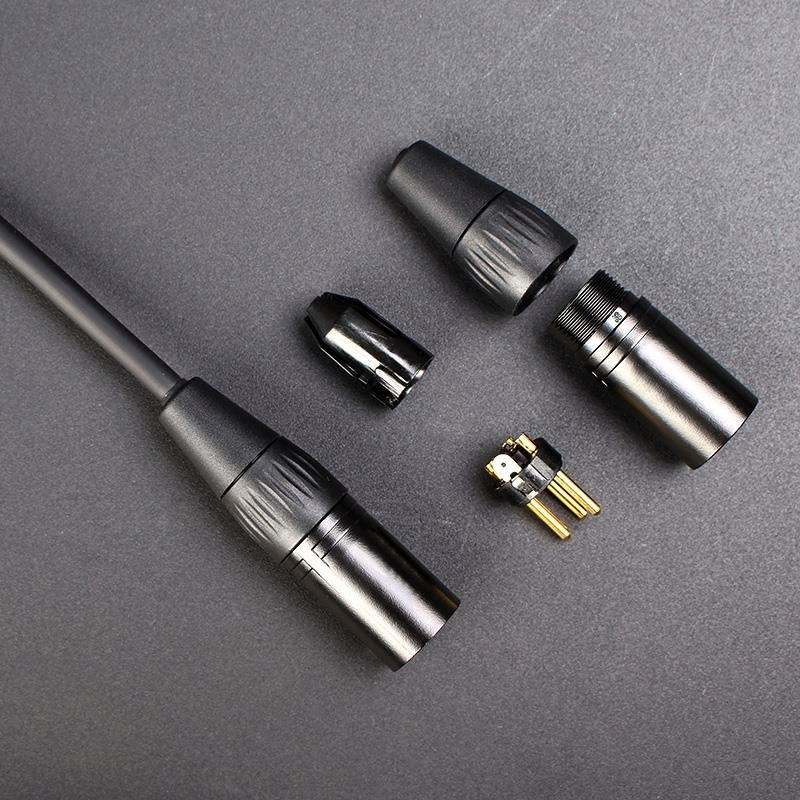
The MC033 in our range is a good example of a stage-oriented design: twisted OFC conductors with a cotton filler and OFC shielding, a flexible PVC jacket, and metal connectors assembled with professional soldering. Metal shells and properly soldered joints are worth pausing on, because the ends of a cable take far more abuse than the middle — they get stepped on, yanked around table corners, and plugged in thousands of times. A moulded-only connector that separates internally will present itself months later as an intermittent crackle that is maddening to diagnose in the dark.
Braid, Spiral or Foil: Picking a Shield for the Job
Shield choice is where cable families genuinely differ, and matching it to the run saves trouble:
- Braided OFC shields offer dense, flexible coverage and strong rejection of EMI and RFI — the default for the cables that travel in your bag and get coiled every night.
- Spiral shields wrap the conductor more loosely and give a very supple cable, popular for live-sound leads that need to lie flat and flex around equipment.
- Foil shields with a drain wire provide full coverage at low bulk and small outside diameter, which is why our project-series cable uses this construction for fixed and embedded wiring — runs inside walls, furniture and custom booth builds where the cable never moves again.
For a mobile DJ, braid or spiral is the practical choice for anything that gets coiled. Foil constructions are best reserved for the semi-permanent runs you might build into a booth or table you own.
When a Snake Beats Five Single Leads
If your rig regularly sends many channels from one point to another — a multi-zone event, a stage with several microphones plus playback, an installation with wall-panel terminations — pulling that bundle as individual XLR leads invites the exact tangle you are trying to avoid. A audio snake cable carries multiple pairs in one jacket, laid once, labelled once, and managed as a single line. For temporary gigs, a short snake from the mixer position to the stage box area replaces a bundle of separate leads; for owned booths, the project-series multi-conductor constructions do the same job permanently.
Length: Keeping the Run Honest
Balanced XLR runs can go much further than unbalanced connections, but length is still a resource to spend deliberately rather than a spec to chase. Three practical principles keep runs honest:
1. Measure the venue path, not the straight line
The cable does not travel through walls — it travels along the floor, around doorways, up behind the PA and away from power runs. Before the gig, estimate the path length, then carry leads in a couple of standard increments so you can pick the one that fits without a huge coil of slack sitting under the mixer. Excess slack is not just untidy; it is another loop for interference and another trip hazard to defend.
2. Prefer one continuous run to a chain of extensions
Every extra connector is two additional contact surfaces, one more mechanical weak point, and one more place for a ground-path discontinuity to appear. If a run routinely needs two short leads joined together, that is the signal to carry one lead of the right length instead. This is also why our stage cables are offered in a range of factory-terminated lengths rather than expecting users to splice.
3. Respect what the length does to high frequencies
Cable capacitance accumulates with length, and on long runs the gentlest audible symptom is a slightly dull top end on a microphone channel. With well-designed balanced cable this is gradual and modest — which is exactly why spending attention on conductor quality and insulation material matters more for long runs than for short ones. The physics gives you a graceful curve, not a cliff, and a cable built with low-resistance OFC conductors and stable PE insulation keeps that curve well behaved across typical venue distances.
Keeping Noise Out on a Crowded Stage
A DJ booth shares its airspace with lighting dimmers, LED supplies, video equipment and mains distribution. Balanced cable with a proper shield does most of the defensive work, but routing discipline finishes the job:
- Cross power runs at right angles. Where an XLR line must pass a mains or lighting cable, cross it at 90 degrees rather than running parallel alongside it. Parallel runs invite inductive coupling; a quick crossing gives interference minimal opportunity to couple.
- Keep the audio bundle separate from the power bundle. Tape, loom and dress the two families of cable on opposite sides of the booth frame.
- Fix hum by isolating loops, not by cutting pins. If a ground-loop hum appears when a processor or laptop joins the chain, solve it with the equipment’s ground-lift or isolation options. Never defeat the earth pin on a mains plug — that trades a nuisance for a genuine safety hazard.
- Localise faults by substitution. Swap the suspect lead for your spare XLR. Ninety percent of on-site noise complaints are resolved in thirty seconds by that substitution, which is why the spare belongs in every bag.
Coil Management: The Habit That Protects the Cable
How a cable is coiled determines how it behaves six months from now. Wrapping a lead tightly around your elbow — the fast way everyone learns first — puts a twist into every loop of the cable, and those twists accumulate as kinks, memory and eventually conductor fatigue. The over-under technique alternates loop direction so the cable stores without twist and pays out straight when thrown on the gig. It takes one evening of practice to learn and pays back for years.
Beyond the coiling pattern, three habits cover the rest of cable care:
- Coil to the cable’s natural flex, not tighter. A gentle loop with the cable held in its relaxed curvature protects the conductors and the filler. Forcing a tight wrap around a small hook stresses the pair exactly where the shield does its work.
- Store coiled with velcro ties, in a bag that breathes. Sealing damp cables in an airtight case after an outdoor gig traps moisture against the connectors. Let the coil dry first, tie it loosely, and bag it.
- Inspect the ends on rotation. Once a month, run your thumb down each connector’s strain relief and check that the boot has not begun to separate from the shell, and give the plug a wiggle in the socket of your mixer while audio passes. Metal-shell connectors with soldered contacts, like those fitted to the MC033, tolerate this routine well — but any cable, from any factory, eventually shows wear at the ends first, and finding it at home costs minutes instead of a set.
XLR Panel Sockets: The Fixed-Point Upgrade
DJs and rental operators who build their own booths, tables and rack furniture increasingly terminate XLR onto the furniture itself. A pair of XLR panel sockets — our XR series covers a range of configurations in this family — mounted into the side of a DJ table turns the table into the patching point: the long run to the PA terminates on the panel, everything on top of the table connects with short leads, and the fragile connectors stop living on the floor where feet find them.
The same approach works for wall plates in fixed installs, for booth side panels, and for the small rack drawers mobile DJs carry. It is a modest piece of hardware, but it moves every connection fault point to a place you can see, access and label — which is most of what reliable signal management is.
A Pre-Gig Checklist for XLR Runs
Condensed from everything above, a quick routine before doors open:
- Plan the run: master to PA, booth feed, microphone. Pick lead lengths that match the path, not the straight line.
- Route audio away from power and lighting lines; cross where crossing is unavoidable.
- Use one continuous lead per run; leave the chain of extensions in the bag.
- Keep one spare XLR next to the mixer, ready to hand — substitution is the fastest fault-finder you own.
- Dress the slack under the table, not in a pile at your feet.
- After the gig: coil over-under, inspect the strain reliefs, dry before bagging.
Conclusion: Small Decisions, Audible Results
XLR runs are the least glamorous part of a DJ setup and among the most consequential. Choose a cable whose construction matches the job — flexible braided or spiral shields for leads that travel, foil-with-drain constructions for fixed runs, multi-pair snake cable when many channels move together — keep each run continuous and sensibly routed, and coil and inspect with the same discipline you apply to your music library. The LESOUND cable range, including the MC033 professional microphone cable, the XR series panel sockets and the broader audio cable families sold under our house brands, is built around exactly these working conditions: metal connectors, professionally soldered joints, OFC conductors and shields that keep doing their job after a touring season of coiling. Build the habit, and the signal chain becomes the part of the rig you never have to think about again.
Post time: Oct-23-2026